


 Rusengeneer
 |  Rusengeneer #0000 Rusengeneer #0000
Date d'inscription : 03/11/2015 Communauté :  Internationale Internationale Messages : 31 Prestige : 0 Niveau : 1  Hors ligne Hors ligne Genre :  Masculin Masculin Localisation : Sweden Âme sœur : Doliprane #0000
Tribu : |
 Derniers messages
 Tribu
Tribu Forum
Forum Membres
We work at jobs that we hate,
to buy things we don´t need,
to impress people we non´t like.
Trust me I´m an engineer!
www.dailymotion.com/video/xrt53z_trust-me-i-m-an-engineer_fun
The only free thing in life is the cheese in a mouse-trap.
/a Russian saying
Latest update:
Map 99 divinity mode, 8 May 2016
Crane builds for maps 0, 4, 17 and 18, 17 Apr 2016
Team Work Challenge (TW-Ch), 9 Apr 2016
It can take some time till next update. Days or weeks. Bare with me and stay tuned.
This is due to creation of my own tribe. And I take it serious and feel I should put effort in it.
Shenanigans, 30 Mar 2016
One-side-bridge Divine mode, Map 46 pix, 29 Mar 2016
One-side-bridge Divine mode, Map 25 pix, 27 Mar 2016
Crane pix, 25 Mar 2016
Swing! pix, 24 Mar 2016
Rotor for Map 3 pix, 23 Mar 2016
Welcome!
To view my concept tutorials, click the tabs.
No copyright applied, use it, modify it, share it, have fun! =)
By the way. If you find some of my info incorrect, please send me a message and describe the fault.
Also. If you like some of my builds but come up with a sleeker/ more stable solution or in any other way that makes the build "better" or easier, feel free to create a screenshot, upload it on IMGUR or alike and send me a forum-mail with a web-link and a description. I may like it and insert as "alternatives" with your name as an author.
Probably all of my tutorials will be in Divine Mode. That is because since I unlocked the Divine Mode and learned how to build with only blue anchors, I just never wanted to go back to Hard or Normal. I guess I am totally addicted to the awesome spawning range of the Divine Mode. Ok, ok, I admit it, I am an addict.. ^^
The Transformice wikia have very good info about basic things in the game and some more advanced tips and tricks. If you are a newbie and would like to master the game, check it out.
http://transformice.wikia.com
There is also a very good thread about the skills, named "Comprehensive Shaman Skill Manual"
And it is indeed what it is called. Comprehensive!
http://atelier801.com/topic?f=6&t=475078
Further more.
When one is new to the game, the building part can be very tricky for some players.
That´s why the creators of the game made a shaman training room.
It is accessed by clicking the menu icon (looks like a small house) and selecting the "Training".
There one can test once´s building skills in a calm and peaceful environment.
There is at least one drawback. The maps are loaded at random.
Also both vanilla maps and other maps are loaded.
There is a way though to load specific maps. Either to learn how to build some difficult maps when one is a newbie or to test a new building concept when one becomes more adept.
To do so, one must first be a member of a tribe. Second, one must have a rank in the tribe that allows to load specific maps.
If both criteria are met, then first "Enter the tribe house". Then select the chat (just like one usually do when one is to write some thing in a normal game play, press Enter) Then type following command:
/np
press Space
type the number of the Vanilla map
press Enter
Example:
/np 18
The TFM-wikia have a section with a list of Vanilla maps. The list is unfortunately not updated at the moment of this writing and some of the maps do not longer exist in the game. But it is only a small amount of maps on that list that are incorrect and I personally find it quite easy to use. It has both map numbers, smaller screenshots and a description of each map.
http://transformice.wikia.com/wiki/Maps
If you are a member of a tribe and want to invite a friend of yours to a temporary visit of your Tribe House, even though your friend is a member of an other tribe, do following.
activate the chat-line
type /inv
press Space
type the player-name of your friend
Press Enter
Example:
/inv Rusengeneer
Fan-mail ^^

This is how you can make a "one-side-only" bridge in "pure" divine mode.
No additional skills required. No restorative, no grapnel, no architect, no eagle eye. Just pure Divine.
No, it is not photoshoped. Yes, it is a chain of 9 anvils hanging down from outer edge.
No, there is no counter weight on the opposite side of the bridge.
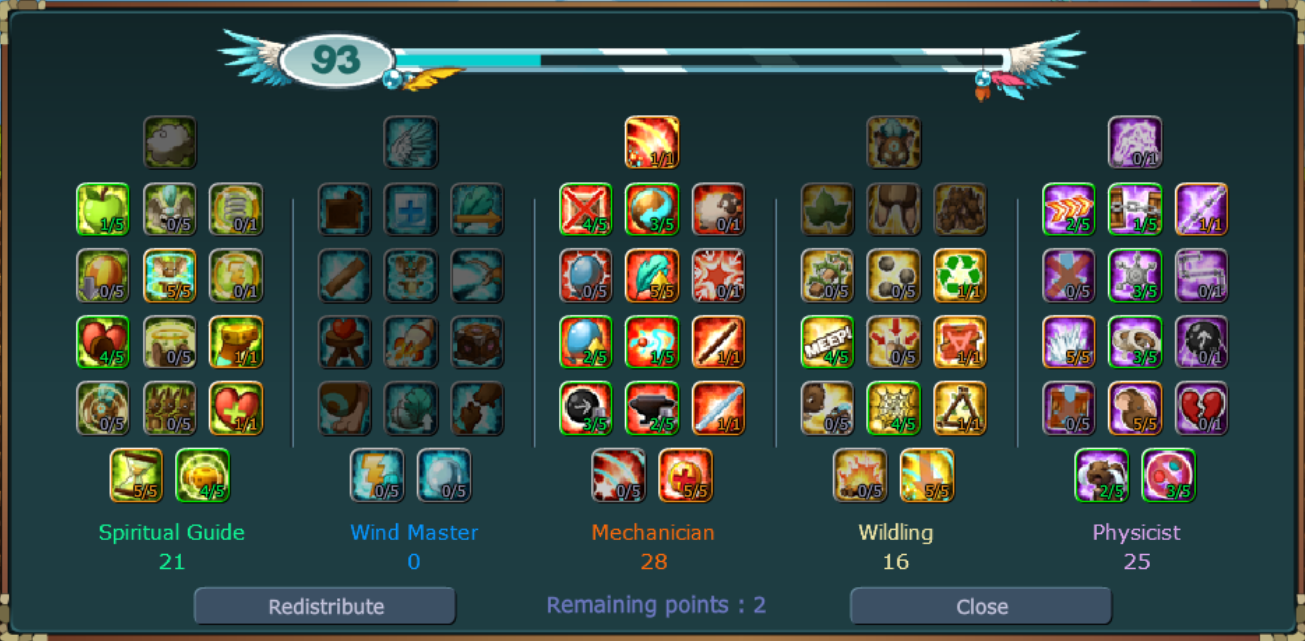
Also, those anvils are heavier than the standard ones, 2 skill points assigned.
Tutorial will maybe come later. Use your brain till then. =P

Yet an other bridge done with pure divine.
This one on map 46

No additional skills required. No restorative, no grapnel, no architect, no eagle eye. Just pure Divine.
No, it is not photoshoped. Yes, it is a chain of 9 anvils hanging down from outer edge.
No, there is no counter weight on the opposite side of the bridge.
Also, those anvils are heavier than the standard ones, 2 skill points assigned.
Tutorial will maybe come later. Use your brain till then. =P
Yet an other bridge done with pure divine.
This one on map 46
Welcome to the Team Work Challenge!
Do you understand and mastered the basics of the game?
Have you come to a point where you feel that it would be fun with a new angle?
Read further.
I got this idea several weeks before I created this tab. I liked the idea but felt no energy manifesting it. A day before creation of this tab, some thing happened though. I was in a Vanilla room together with some friends and some other people. A "Transform-Mice" map loaded. Some where in the middle of the game a couple of mice started to build an anvil-tower and one of them said "Hey, come here and join." And at the end of the game there was an 6-anvils-tower standing up. This spontaneous cooperation was so beautiful, that it ignited my energy to create this tab.
The idea is, that I create a blueprint of some builds for those cooperation maps. Then players in the same room as I am can try to build one. If successful, I take a screen-print of the result, crop the image, upload it next to the blueprint and insert the names of participants. It could be some thing like a "Hall of fame". First group to build a certain blueprint. I think that I need to be in the room to know that the build is authentic and not manipulated. Although, I think I could also insert others TW-builds outside the "Hall of fame" list, if some would take a Scr-Pr, upload it to Micepix and send me the link. My pix are all 1050 wide.
Why? Why not? =)
A special thank to: Shetthat, Shrewrat, Marijayay, Elen1020, Thepronubxd and Micemusee.
Initially, I think that first three builds must be done in order 1, 2, 3. After that? Time will tell.
Blueprint | Build |
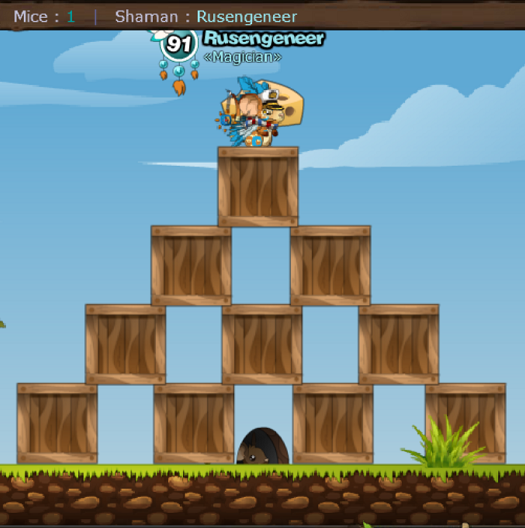
| 1. Pyramid 10 players | |
 | Free slot |
| . | |
| 2. Reverse Eifel 10 players | |
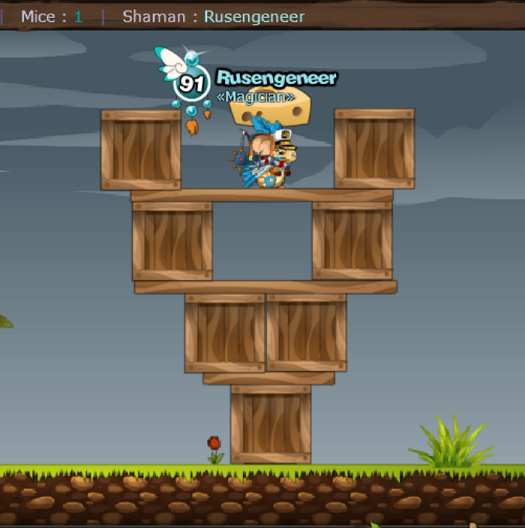 | Free slot |
| . | |
| 3. Eifel 10 players | |
 | Free slot |
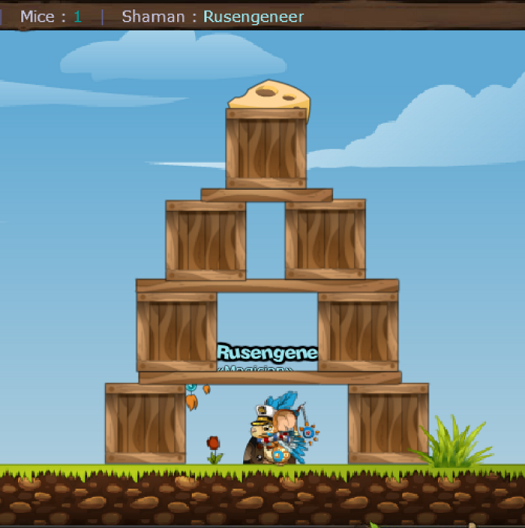
This concept was born due to lack of red anchors in divine mode.
Then how to build a paris-wheel-like machinery without the global anchors?
The answer is Restorative skill!
Note! that most of this build consists of Ghosted objects.
Required skills: Restorative- 2 skill points (minimum 1 skill point with only one platform)
Alternative skills: Architect, Choco plank, Ice plank. (Freeze?)
Note!
This build is very sensitive to sabotaging mice that use fish, planes and other alike consumables.

First part. The invisible ramp.
1- Start with a Big, Ghost box. Put it on the ground, under the "Cheese-Island", on the left side. Place that box so that the center of the box is approximately in vertical line with the left edge of the cheese-island.
2- Attach a standard long, Ghosted plank to the left, upper corner of the big box.
Place it that way, so it tilts to the cheese-island.
VERY IMPORTANT!
The attachment point must be as way out on the box as possible. Because if the corner of the box is outside the plank, the rotor part will land on the corner of the box and climb over the ramp.
3- Attach a second, ghosted long plank, to the first plank, on top of the cheese-island.
4- Attach a third, ghosted long plank, hanging down from the second plank, on the other side of the cheese-island.
5- Attach a forth, ghosted long plank, to the third plank, under the right corner of the cheese-island.
Attach it angled that way, so that the left side of the forth plank is wedged in the corner between the big box and the first plank.
6- Connect the forth plank to the big box with a nail/anchor. Using the purple arrow and V.
Note. Double-anchoring connections can be a good idea. Though I can not advise when to put the second anchors. Right after the placement of each object or all at once after one have connected the forth plank to the big box. Things can "crawl" out of their original positions either ways. Also. Connecting a ghosted anvil inside the ghosted big box can be an alternative. But as most know, anvils are notorious spazers. =)

Second part. The funky rotor.
7- Put a Solid, short plank next to the big box, on the left side of the box.
(One can also spawn that platform plank as ghosted and "Architect" it to solid, when the whole build is complete. That is because many mice are impatient and naughty. When bored while sham builds ghosted objects, very often many mice start pushing around the first solid objects. ^^ But architecting a moving machinery can be tricky, it is very easy to miss the aimed object or to architect the wrong one. Solution is some what simple. The right side of the platform is blocked with the big box. The left side can be blocked by the shamans body.)
8- Apply Restorative skill to the short platform-plank. Because the plank lays on the horizontal ground, it will remain horizontal after one have applied the restorative.
9- Connect a long, ghosted plank to the center of restorated short plank. Using the BLUE, V- anchor/nail.
(One can also attach the long plank to other parts of the short platform-plank than center.)
10- Connect a second, short, solid (or ghosted, if you have and prefer to architect) platform-plank to the left edge of the ghosted long plank.
IMPORTANT!
This connection must be done with an engine! There are two! Which one to use?
In this case, we want our thingy to rotate and move/roll/crawl to the right of the screen, towards the invisible ramp that will prevent it from rotating out of the map. To achieve this, we need to connect our second platform-plank with an engine that rotates COUNTER-CLOCKWISE.
And here comes a little tricky part. Doing so, the rotor will start to "crawl" TO THE LEFT!
Next important step. Before applying the second platform, stand with your shaman to the left of the second platform. This positioning will make next and final step easier.
Keys/buttons:
Clockwise Engine/Motor Anchor/nail - N
Counter Clockwise - J

11- Because the funky rotor have started to crawl towards the abyss, we need to act some what fast.
We stand with our shaman to the left of the second platform. The platform rotates and comes on top of the shamans head. This is very useful. While the center of the rotating platform rests on the shamans head, it moves relatively minimal, compared to if the whole thing was on the ground. This makes the applying of the restorative to the second platform-plank much easier than otherwise.
Also important!
DO NOT apply the restorative to the center or right side of the platform! There is high risk the restorative will be placed on the middle, ghosted, long plank, ruining the build. Apply the restorative to the outer side of the platform-plank, where the distance to the middle plank is far enough. It is tricky though... Trying to place the restorative to far out, and the skill will miss the moving/rotating platform-plank.

Alternative platforms.
There are three types of short planks in the game. Wood (standard), Chocho (alt. skill) and Ice (alt.skill)
Possessing Choco and/or Ice, gives you the possibility to choose how easy or difficult the rotor is for mice to use.
In my experience, even newbies can handle the "middle-difficulty", wooden platform.
Ice platforms are very slippery and can also be easily pushed out of the map by naughty troll-mice.
Have fun! =)
Waste time, dance, brag, or do what ever other shananigans you like.
Trivia. Lady Syubsuga calls this build a "Fun Fair" =)

Rotor-technique for Map 3.
Required skills: Restorative x3, Eagle Eye, Big Plank, (Demolition Worker)
This build requires some precision. It can also be some what dangerous for newbie mice.


A tricky build for Map 2 that requires VERY good precision, building speed and timing.


This technique is originally not mine.
I once saw a player doing it, was amazed and stole it!
"Plagiarism is the most sincere form of flattery"
Required skills: Restorative, (Architect?)
Additional skills: Big Plank, Architect, Demolition Worker, Grapnel or Personal Teleporter, Stop! (Freeze)
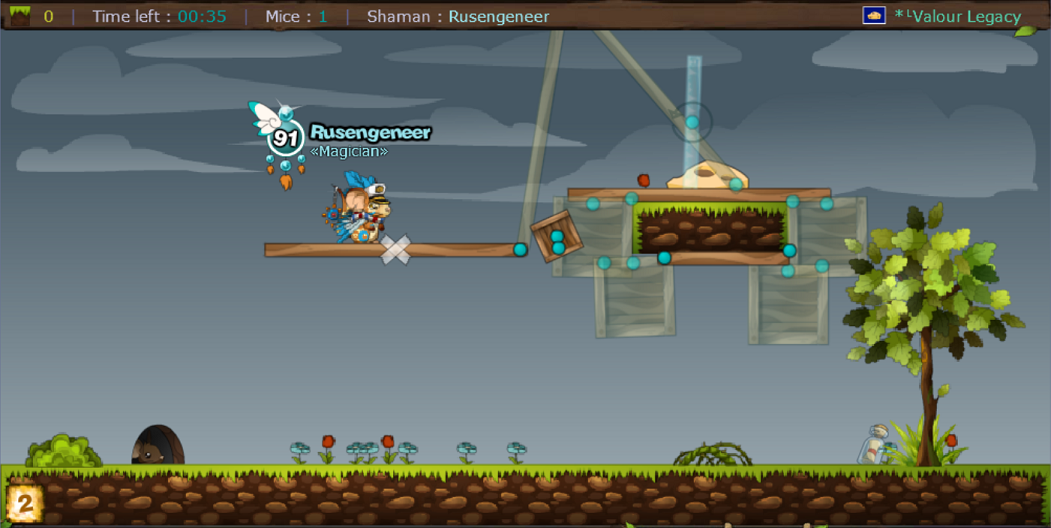
This bridge building technique is suitable for maps where the ground areas on left and right side of the map are minimal and the abyss/pit is maximal.
This build works best if you have the skill Big Plank, then you only need two (2) Restoratives to make a long bridge all the way from one side of the map to the other. If you are short on skill points to get all the way to the Big Plank, then you would need three (3) restoratives to get all the way from one side of the map to the other using only standard long planks.
1- If we assume that we start at the left side. Select the plank, press space to ghost it and put it down on the ground. Put it as far out into the abyss as possible, but not to far out, or it will tilt over and drop down. The best is if the center of the plank is just a bit from the edge of the ground.
Why ghosted? Well, ya know, there are these rats that are anxious to get to the cheese. Do they care if shaman is finished with the build or not? Well, maybe in rare occasions. But almost all of the times, they do not care. If they see some thing solid, they run. Ghosted objects is one way of pest controlling. If you do not have the Architect skill, then you first place a number of ghosted anvils on the ground and then put down the solid plank under the anvils. Even if you do so, you can not place a solid plank with the center as close to the edge, as you can do if the plank is ghosted. Well, you can, but anvils are always little bouncy and the more anvils you put in one spot, the higher is the risk for them to bounce out of their original positions and at some point ruin the build. Further more. If you start with anvils, you may occasionally need to remove them before proseding to further steps. Shooting away anvils with cannon balls is one way to do it. But doing so, always shifts the position of underlying object. More or less, but still.
2- Apply Restorative skill to the plank.
3- Put a second, ghosted plank on top of the first one, the same way you put the first one on the ground.
4- Apply Restorative skill to the second plank.
( 4.1 )- Repeat again, if you do not have Big Plank.
5- Here comes the fun part. Select a Big Box and ghost it. Select the CLOCKWISE blue engine/anchor ( N-button ). Connect the engined box to the upper most plank. Where on the plank to make that connection? Do not worry, I will tell you. The most important is that you want the anchor be applied to the upper plank and only that. To avoid the mistake of connecting the upper plank and the one under it, you need to apply the anchor slightly on the upper side of the plank it self, rather than on the middle of it.
That was where on the vertical axis. Where to aply the anchor on the horizontal axis of the plank (side ways orientation)? Well, you want your plank to "walk" as far as possible. Then you need to place the box as far as possible on the left side of the plank. But not to far out, or it will fall of the edge. To do so, just before you connect the box, rotate it 45 degrees with your mouse-wheel. That way you will know the outer most point of the rotating box, on the horizontal axis. Then connect the engined and ghosted box to the upper plank so that the outer most point of the rotating box is a bit to the right of the left edge of the plank.
6- The plank will now be lifted up and start "walking out". Wait for it.. When the rotating box "walks" the upper plank all the way out, it drops down on the underlying plank. Give the box additional time to rotate and to push the plank the last distance. When that is done, connect the upper plank and the one underneath it with a nail (blue, V).
7- Repeat step 6 on the next underlying plank.
8- Assuming that the plank closest to the ground have done "the walk" and dropped down. Select the nail (blue, V), wait till the rotating box on the "ground-plank" is almost vertical, but tilts a little bit to the right, double-anchor the rotating box in that position. This will create a "stopper". Why do we need that "stopper"? Well, do you remember those rats? Ye, there are almost always one or two that loves to sabotage. Pushing shaman´s object sideways, thus ruining shaman´s build and day. Now you have your left stopper.
9- Make the right outermost plank solid by applying Architect to it.
10- Move over to the other side using Grapnel or Personal Teleporter. Push the bridge so that your first, left "stopper" makes contact with the ground on that side. It may be that you must use a cannon ball to do so, if you are unable to push the bridge with your shaman.
11- Select Big Box, press V twice to move the anchor to the edge of the box. This box will be the second stopper, on the right side of the bridge. Rotate the box 90 degrees so that the anchor is on the upper side of the box. Connect the box to the plank as close to the ground as you can. Secure that second "stopper" by double-anchoring it to the plank.
12- Solidify the rest of the ghosted planks with Architect, wich will allow mice to use the bridge.
To be continued, work in progress. Take it cheasy, pix will be commin. =) Or you could already try to build it from the texted description, yer lazy, felthy rets! =P
I once saw a player doing it, was amazed and stole it!
"Plagiarism is the most sincere form of flattery"
Image : http://vignette3.wikia.nocookie.net/transformice/images/a/a9/25.png/revision/latest/scale-to-width-down/270?cb=20140527113527
Cette image a été masquée par défaut afin de préserver votre vie privée.
Image : http://vignette3.wikia.nocookie.net/transformice/images/7/71/21.png/revision/latest/scale-to-width-down/270?cb=20140527113525
Cette image a été masquée par défaut afin de préserver votre vie privée.
Required skills: Restorative, (Architect?)
Additional skills: Big Plank, Architect, Demolition Worker, Grapnel or Personal Teleporter, Stop! (Freeze)
This bridge building technique is suitable for maps where the ground areas on left and right side of the map are minimal and the abyss/pit is maximal.
This build works best if you have the skill Big Plank, then you only need two (2) Restoratives to make a long bridge all the way from one side of the map to the other. If you are short on skill points to get all the way to the Big Plank, then you would need three (3) restoratives to get all the way from one side of the map to the other using only standard long planks.
1- If we assume that we start at the left side. Select the plank, press space to ghost it and put it down on the ground. Put it as far out into the abyss as possible, but not to far out, or it will tilt over and drop down. The best is if the center of the plank is just a bit from the edge of the ground.
Why ghosted? Well, ya know, there are these rats that are anxious to get to the cheese. Do they care if shaman is finished with the build or not? Well, maybe in rare occasions. But almost all of the times, they do not care. If they see some thing solid, they run. Ghosted objects is one way of pest controlling. If you do not have the Architect skill, then you first place a number of ghosted anvils on the ground and then put down the solid plank under the anvils. Even if you do so, you can not place a solid plank with the center as close to the edge, as you can do if the plank is ghosted. Well, you can, but anvils are always little bouncy and the more anvils you put in one spot, the higher is the risk for them to bounce out of their original positions and at some point ruin the build. Further more. If you start with anvils, you may occasionally need to remove them before proseding to further steps. Shooting away anvils with cannon balls is one way to do it. But doing so, always shifts the position of underlying object. More or less, but still.
2- Apply Restorative skill to the plank.
3- Put a second, ghosted plank on top of the first one, the same way you put the first one on the ground.
4- Apply Restorative skill to the second plank.
( 4.1 )- Repeat again, if you do not have Big Plank.
5- Here comes the fun part. Select a Big Box and ghost it. Select the CLOCKWISE blue engine/anchor ( N-button ). Connect the engined box to the upper most plank. Where on the plank to make that connection? Do not worry, I will tell you. The most important is that you want the anchor be applied to the upper plank and only that. To avoid the mistake of connecting the upper plank and the one under it, you need to apply the anchor slightly on the upper side of the plank it self, rather than on the middle of it.
That was where on the vertical axis. Where to aply the anchor on the horizontal axis of the plank (side ways orientation)? Well, you want your plank to "walk" as far as possible. Then you need to place the box as far as possible on the left side of the plank. But not to far out, or it will fall of the edge. To do so, just before you connect the box, rotate it 45 degrees with your mouse-wheel. That way you will know the outer most point of the rotating box, on the horizontal axis. Then connect the engined and ghosted box to the upper plank so that the outer most point of the rotating box is a bit to the right of the left edge of the plank.
6- The plank will now be lifted up and start "walking out". Wait for it.. When the rotating box "walks" the upper plank all the way out, it drops down on the underlying plank. Give the box additional time to rotate and to push the plank the last distance. When that is done, connect the upper plank and the one underneath it with a nail (blue, V).
7- Repeat step 6 on the next underlying plank.
8- Assuming that the plank closest to the ground have done "the walk" and dropped down. Select the nail (blue, V), wait till the rotating box on the "ground-plank" is almost vertical, but tilts a little bit to the right, double-anchor the rotating box in that position. This will create a "stopper". Why do we need that "stopper"? Well, do you remember those rats? Ye, there are almost always one or two that loves to sabotage. Pushing shaman´s object sideways, thus ruining shaman´s build and day. Now you have your left stopper.
9- Make the right outermost plank solid by applying Architect to it.
10- Move over to the other side using Grapnel or Personal Teleporter. Push the bridge so that your first, left "stopper" makes contact with the ground on that side. It may be that you must use a cannon ball to do so, if you are unable to push the bridge with your shaman.
11- Select Big Box, press V twice to move the anchor to the edge of the box. This box will be the second stopper, on the right side of the bridge. Rotate the box 90 degrees so that the anchor is on the upper side of the box. Connect the box to the plank as close to the ground as you can. Secure that second "stopper" by double-anchoring it to the plank.
12- Solidify the rest of the ghosted planks with Architect, wich will allow mice to use the bridge.
To be continued, work in progress. Take it cheasy, pix will be commin. =) Or you could already try to build it from the texted description, yer lazy, felthy rets! =P
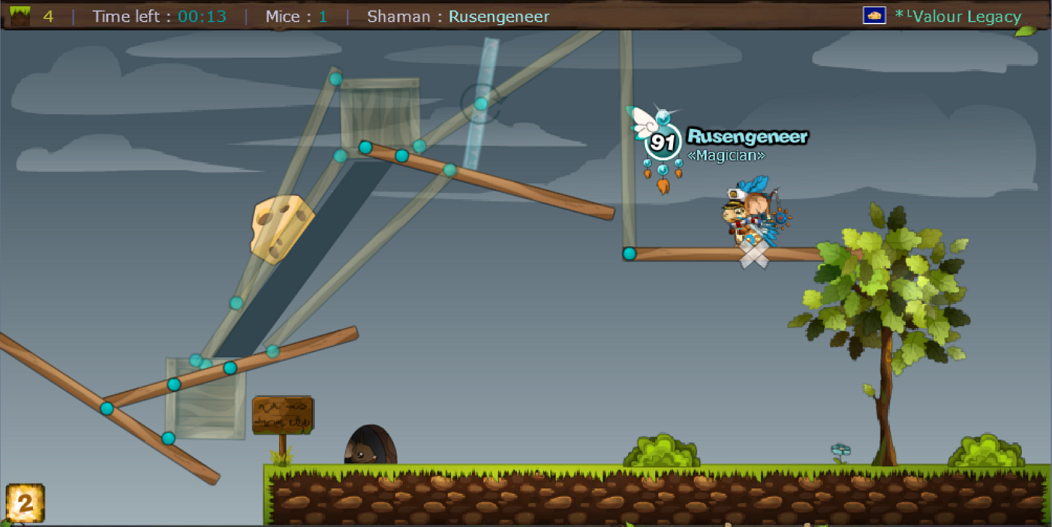
A build for vanilla map 3 and 17.
Quite easy for divine sham to build, probably quite hard for newbies mice to complete.
Best suited for rooms where most players are adept and love challenging solutions.
Expect casualties on Map 3.
Uses 2 Big Planks, 2 Restoratives and a number of other objects.


Balls instead of small boxes.

Jampi v.2 ( Vanilla map 17 )


Quite easy for divine sham to build, probably quite hard for newbies mice to complete.
Best suited for rooms where most players are adept and love challenging solutions.
Expect casualties on Map 3.
Uses 2 Big Planks, 2 Restoratives and a number of other objects.
Balls instead of small boxes.
Jampi v.2 ( Vanilla map 17 )
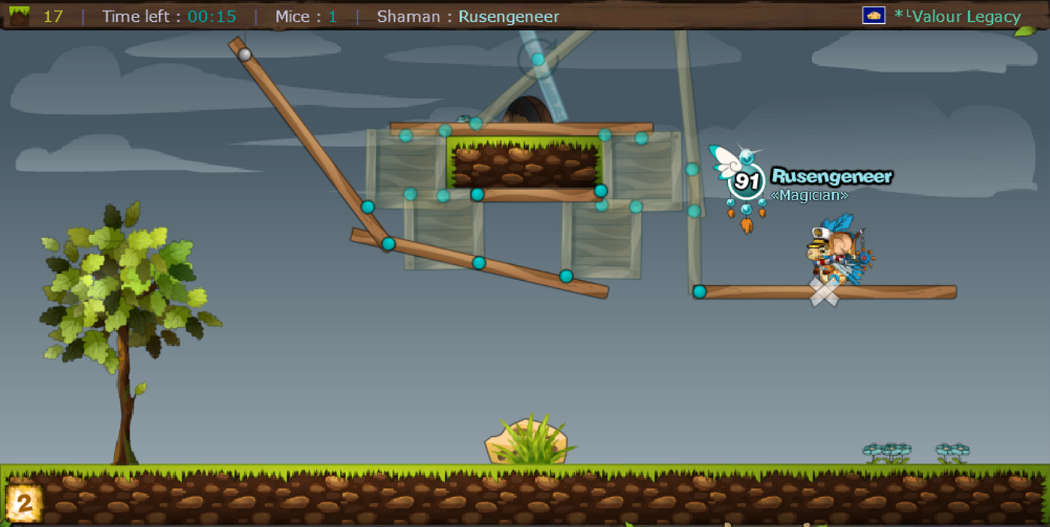
A tricky build that requires some precision. Not very safe for newbies mice. Expect casualties.
The first part of the build uses the "Walker" technique (1-5). You can check out the texted description in that tab.
Required skills: Restorative x2, Big Plank.
Additional skill: Architect


The first part of the build uses the "Walker" technique (1-5). You can check out the texted description in that tab.
Required skills: Restorative x2, Big Plank.
Additional skill: Architect
Stay tuned! =)
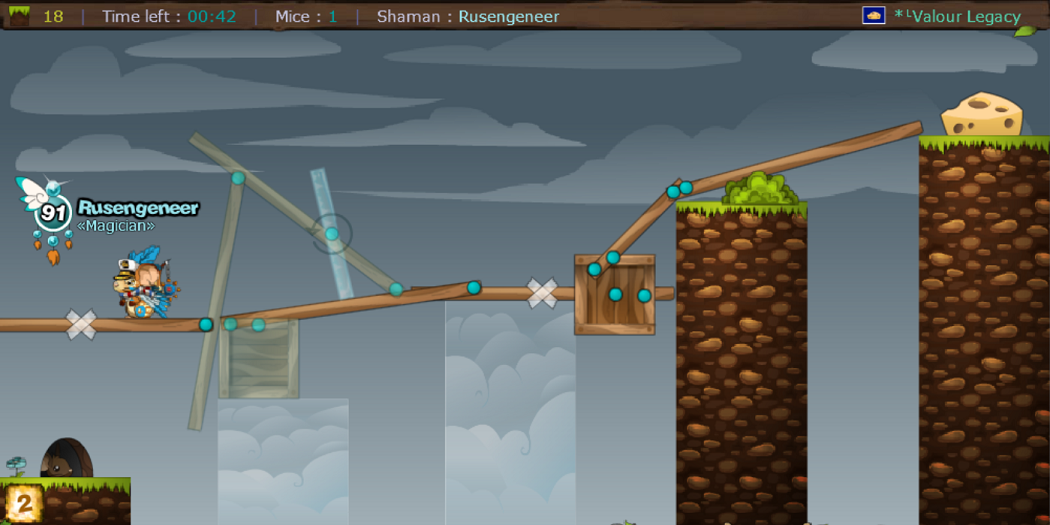
A crazy build for map 18
The map that I personally find most boring to sham. But I got an idea and tried it in the tribe house with the /np-command. It totally backfired ^^. BUT. The result of the backfire was to my eyes crazy beautiful. I tested again to see if the result was a fluke. The result was successfully recreated many times. Good golly and shimber mi timber! Though yet to be tested in live environment with mice affecting the physics of the build.
I also downgraded the idea that backfired and discovered that it worked surprisingly well. A perfect build that gives mice one chance ONLY, to get the cheese AND get back home.
Stay tuned, comin sooon =)
Image : http://vignette4.wikia.nocookie.net/transformice/images/8/88/18.png/revision/latest/scale-to-width-down/180?cb=20140527113415
Cette image a été masquée par défaut afin de préserver votre vie privée.
A trolling build.
Tired of that player that constantly trolls and "plays survival" in vanilla?
Pray for this map on your shaman-turn and troll the troller. "Laggers" escape this cage very easy though.
To imprison trolls and let ´em dangle at a display is more humiliating than just wiping ´em out..
Required skills: Big plank, Earth Symbol, Handymouse ( step 13 )
Additional skills: Restorative, Stop!
Vanilla map 99 done in divinity mode

Image : http://vignette1.wikia.nocookie.net/transformice/images/8/83/131.png/revision/latest/scale-to-width-down/270?cb=20140527120916
Cette image a été masquée par défaut afin de préserver votre vie privée.
Image : http://vignette2.wikia.nocookie.net/transformice/images/3/3e/134.png/revision/latest/scale-to-width-down/270?cb=20140527120917
Cette image a été masquée par défaut afin de préserver votre vie privée.
Some times I get bored.
And if you would count the balls, you would discover that there are 3 in the inner triangle and 33 around it.
Also, there are 3 rows of balls between the inner triangle and the outer triangles´ sides.

And if you would count the balls, you would discover that there are 3 in the inner triangle and 33 around it.
Also, there are 3 rows of balls between the inner triangle and the outer triangles´ sides.