


 Dead Maze
 Basic guide to Dead Maze Basic guide to Dead Maze |
| 19 | ||||||||||||||||||||||||||
| Basic guide to Dead Maze This is a guide made to show the basic aspects of the game. The game's interface, basic gameplay, and building and crafting things. It contains images and simple explanations in order to make it easier to understand. I am by no means an expert in this game and the information shown here might be incorrect in some parts, or might change in the future, considering the game is in beta. If you find something wrong or outdated, please let me know and I will fix it.
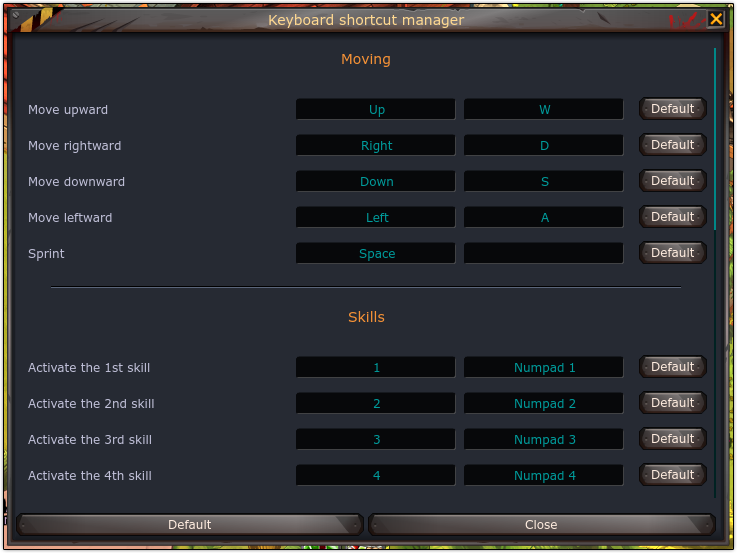
Game interface
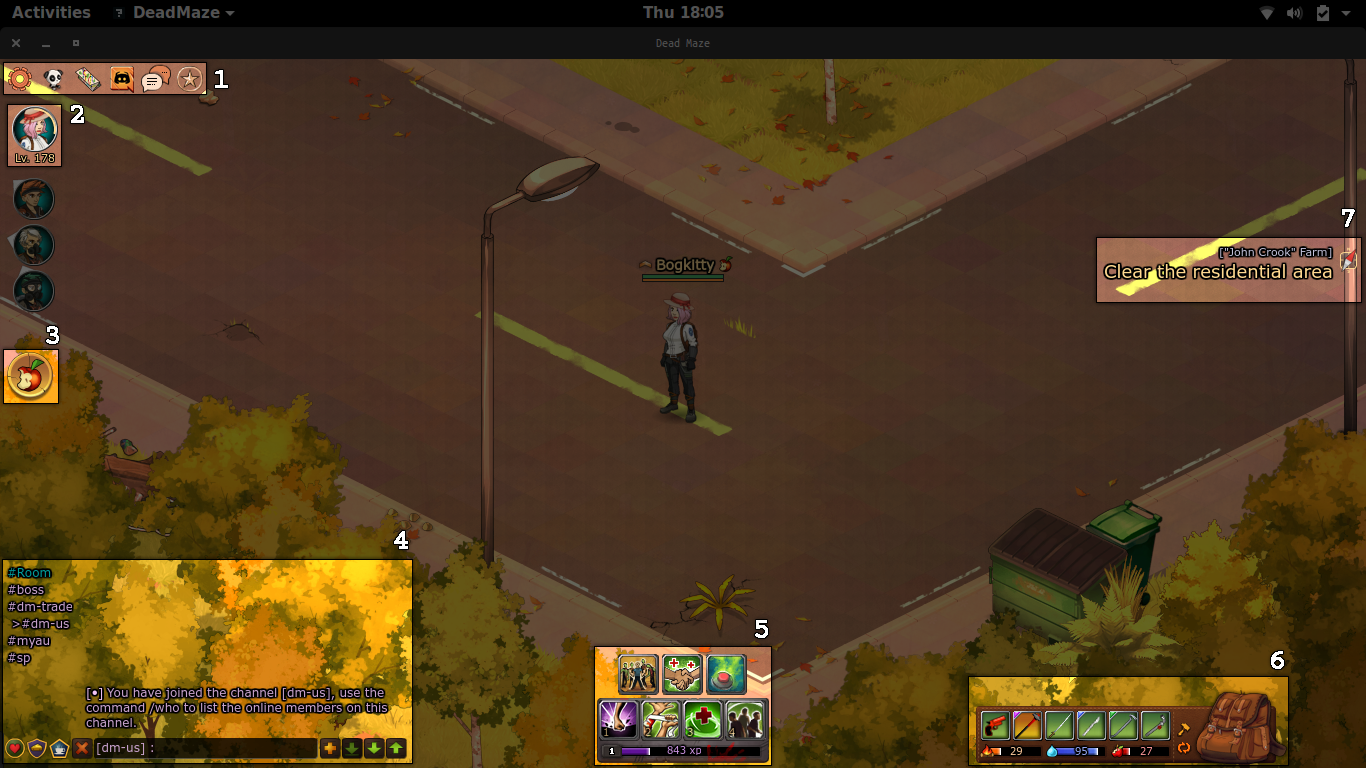
1. Settings, information, groups and daily quests  Settings - Allows you to turn music and sounds on and off, change the quality, zoom, set the game to fullscreen, etc. Settings - Allows you to turn music and sounds on and off, change the quality, zoom, set the game to fullscreen, etc.
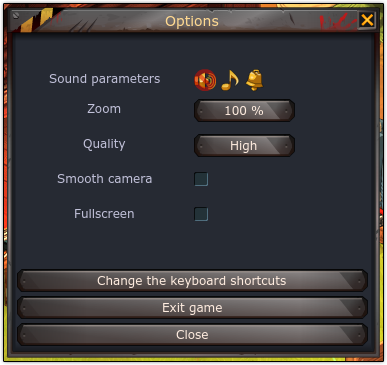
You can also access the keyboard shortcut manager from this window.
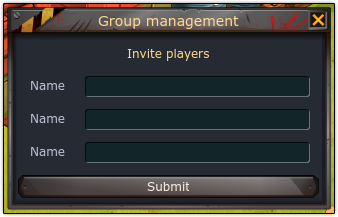
 Group management - From this window you can invite players to your group. A group can have up to 4 players in it. Group management - From this window you can invite players to your group. A group can have up to 4 players in it.
Other players' character icons appear below yours when you're in a group, and when you're in the same zone as them you can see an arrow pointing where they are. When you create or join a group you automatically get added to a private chat where you and your group members can chat.
 Zone information - You can see basic information of the zone you're currently in. The zone's name, how many players are in it, and how many infecteds. Zone information - You can see basic information of the zone you're currently in. The zone's name, how many players are in it, and how many infecteds.
 Shop - Opens up the shop. Shop - Opens up the shop. Discord - Directs you to the official Dead Maze discord server. Discord - Directs you to the official Dead Maze discord server. Forum - Directs you to Atelier 801 forums. Forum - Directs you to Atelier 801 forums. Daily quests - You can see daily quests here. Daily quests - You can see daily quests here.
If you haven't completed the mission yet, you can click on the 'change' button to get a new one. You can only do this with one mission every 24 hours, so choose wisely. Once you complete the mission you can click on the 'claim' button to choose your reward from 3 random options that can be experience, money, weapons, resources, etc. 2. Character profile
1. Kits (explained in camp, sewing workshop) 2. Skills - You can have 4 active skills and 2 passive skills active at a time. These skills can be obtained by leveling up, by buying them on Lakeview, or completing research projects on the research workshop. 3. Player stats - In white you can see experience obtained, maximum health and current level, in blue you can see your bonuses, which can be obtained by leveling up and they stack to a certain limit:
4. Equipment - You can equip clothes in these slots. Depending on the tier of the clothes and their quality you receive extra health points and slots to equip kits. Tiers, quality and kits are explained in the camp tab, on the sewing workshop section. 5. Appearance - Clothes can be equipped in these slots for purely aesthetic reasons. Kit bonuses don't count, and only clothes updated to exceptional quality can be equipped. 6. Title - You can choose any title from your obtained titles. You can get them by completing missions or doing specific things, like killing infected in a specific way or doing expeditions. 7. Suicide - In case you get stuck you can select this option to return to your camp. However, all your items will be left behind, so think twice before clicking this option. 3. Effects These can be positive or negative and depend on how well you're fed, how tired you are, etc.
4. Chat The chat is as simple as it gets, click on the text box, write something, press enter to send. But there are a few tricks to it and many cool things too. Buttons:  Friends - This button opens your friend list, you can add or remove players to both your friend list and your blacklist here. You can also see if your friends are online and what room, community, and a801 game they're in, or if they're offline you can see their last login date. Friends - This button opens your friend list, you can add or remove players to both your friend list and your blacklist here. You can also see if your friends are online and what room, community, and a801 game they're in, or if they're offline you can see their last login date.
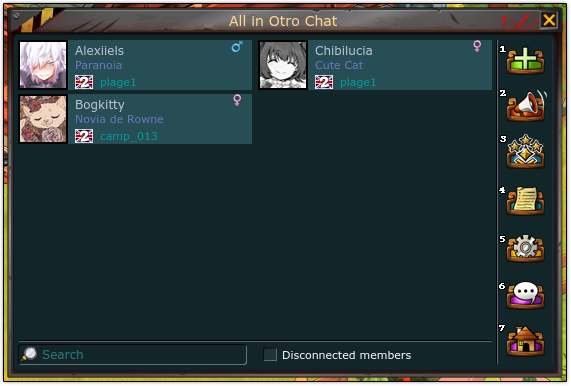
To add a friend click on the green +. To access your blacklist click on the skull.  Tribe - This button opens your tribe. If you don't have a tribe it'll open the tribe creation window, where you can create one for 100 reputation. Tribe - This button opens your tribe. If you don't have a tribe it'll open the tribe creation window, where you can create one for 100 reputation.
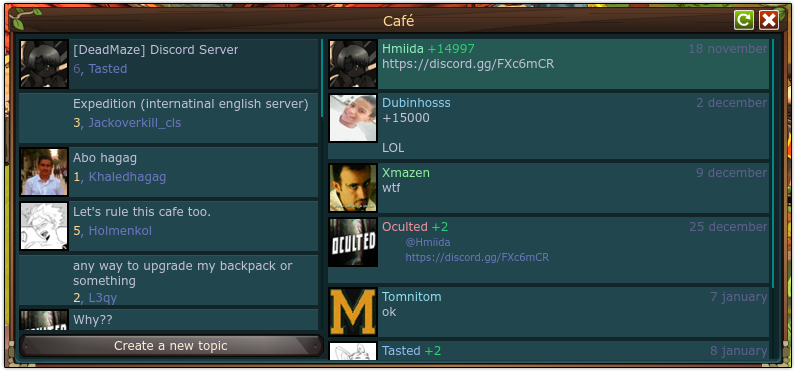
1. Invite a player. 2. See the welcome message - This allows you to see the welcome message and change it if your rank has the proper permissions. 3. Ranks information - Rank names, permissions and order. 4. Change history - Who joined and when, who invited them, who changed the welcome message, who kicked who, etc. 5. Settings - Allows you to see the tribe's profile on the forums, leave the tribe, or set a map code for your tribehouse (Transformice only). 6. Tribe forum. 7. Enter the tribehouse - This currently only works on Transformice.  Café - A small, simple forum inside the game used for short-lived topics like "who wants to go on an expedition?" and questions like "how do I get precious ore?". Café - A small, simple forum inside the game used for short-lived topics like "who wants to go on an expedition?" and questions like "how do I get precious ore?".
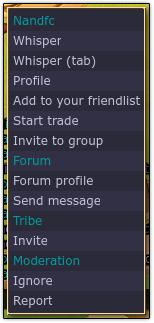
To the left you can see the topics, click on any to see the comments on the right side. The original post is marked in a different color. You can like, dislike, or quote a post by clicking on the poster's avatar. To comment, just scroll down until you see a text box. To create a topic, simply click on the "create a new topic" button.  Close tab - If you're in a tab other than the main chat (a chat, your tribe chat, a whisper chat) you can close it by clicking this icon. Close tab - If you're in a tab other than the main chat (a chat, your tribe chat, a whisper chat) you can close it by clicking this icon.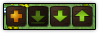 Use these to extend the chat, go to the newest message, go down, or go up respectively. Use these to extend the chat, go to the newest message, go down, or go up respectively.Useful commands: /chat name - Create a chat. Anyone who knows the chat name can join. Popular chats are #sp and #dm-trade. /t - Tribe chat. /t* - Opens your tribe chat in a separate tab. /c username - Whispers a player. /c* username - Whispers a player in a new tab. /p - Group chat. /p* - Opens group chat in a separate tab. Shortcuts Press "enter" when outside the chat to write something. Press "t" outside the chat to automatically write /t or switch to your tribe tab. Press "c" to reply to the last player that whispered you. Press "shift" to switch to tabs with unread messages. You can also click a player's name and you'll get a window with many options, so you don't need to memorize most of the commands:
5. Skills and experience
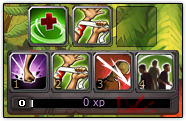
The skills with numbers are your basic skills, these can be chosen on your profile. If you press the numbers shown they will activate. The skills on top are survivor equipment (explained below) skills and item skills. These vary depending on what equipment you have or the item you're holding. To the bottom you can see how much experience you've gathered and your threat level. You fill this bar by killing infecteds. Every 700 experience points you get a threat level. For every threat level your food and water bars get consumed quicker, and zombies do more damage, but you also get bonus experience. You also get better loot the higher your threat level is. The maximum threat level you can reach is 20. To see how much extra damage you're taking, hunger and thirst, and experience, just hover over the bar. 6. Bag Your bag is used to store items you gather in zones by opening containers, killing zombies, completing missions, etc. - To open your bag, simply click the bag image. To close it, click it again. - You can change the item/weapon you're holding quickly using your mouse's wheel.
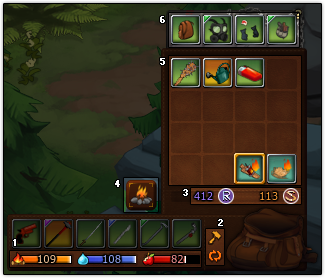
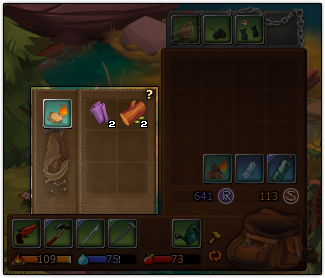
1. Rest, food and water bars Pay attention to these bars and try to keep them full at all times. Picking up items costs rest, and fighting costs water and food. If your food or water bars go below 40 you won't have a second chance if you die! 2. Options  Opens up the resource menu, where you can salvage items on the go by just dropping them there. Picking up the resources obtained costs food or water. You can then use these resources to craft weapons or useful items. Possible items that can be crafted with the resources available will show on the left, clicking them will craft the item and take the resources needed. Opens up the resource menu, where you can salvage items on the go by just dropping them there. Picking up the resources obtained costs food or water. You can then use these resources to craft weapons or useful items. Possible items that can be crafted with the resources available will show on the left, clicking them will craft the item and take the resources needed.
These resources can be moved from and to your stock by having both your stock window and your resource menu open at the same time. Click a resource on your stock to add 5 to your resource menu, or click on the menu to add 5 to your stock.  Organizes your inventory. Organizes your inventory.3.  Reputation and Reputation and  survivor marks You can get these by completing daily quests, missions, leveling up (rep only) and doing research projects. They're used as currency and you can buy clothes (camp), blueprints, food, and weapons (lakeview) with them. survivor marks You can get these by completing daily quests, missions, leveling up (rep only) and doing research projects. They're used as currency and you can buy clothes (camp), blueprints, food, and weapons (lakeview) with them.4.   Fire and food If the item you're holding is a fire starter, or something that could be used to start a fire (torch, lighter, …), you can make a campfire with it, bear in mind you will lose the item when you do this. If you're holding food, you can eat it but it'll cost 10 rest points. Fire and food If the item you're holding is a fire starter, or something that could be used to start a fire (torch, lighter, …), you can make a campfire with it, bear in mind you will lose the item when you do this. If you're holding food, you can eat it but it'll cost 10 rest points.5. Inventory You can carry up to 22 items at a time, once your bag is full you can't pick up any more items, so you have to salvage them using your resource menu, go back to your camp (which you unlock after a few missions) and salvage the items or throw some away if you want to get more. 6. Survivor equipment It's like clothing, but you can get these anywhere if you're lucky and they have certain effects (healing skill +30%, for example), skills. However, they're not permanent, if you die you'll lose them forever. For more information about survivor equipment, feel free to visit the Dead Maze wiki. 7. Missions
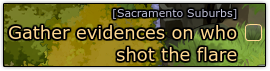
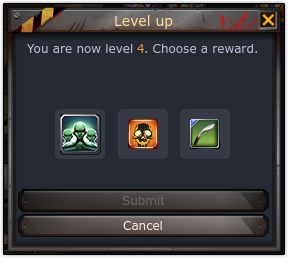
Missions are shown on the right side of the screen. On top you can see the zone where the mission takes place (in the example picture, you have to go to Sacramento). A yellow arrow below your character will point at your target so you get an idea of where you have to go. However, this arrow doesn't show you the path, you'll have to discover that on your own. Once you complete a mission you will automatically get the next one, until you complete all missions. You can have more than one mission active at a time. Optional missions will have the word [optional] in them. Gameplay Your character 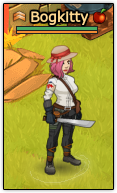 This is a character, on top of it you can see the username, to the right, active effects (they're miniature images of the effects listed in "game interface") and to the left how many strategies they have active at the time: This is a character, on top of it you can see the username, to the right, active effects (they're miniature images of the effects listed in "game interface") and to the left how many strategies they have active at the time: One strategy. One strategy. Two strategies. Two strategies. Three strategies. Three strategies. Four strategies. Four strategies. Five strategies. Five strategies. All strategies. All strategies.Below the username you can see the health bar in green, and the stamina bar, in orange. You can move your character by using your arrow keys, WASD, or anything you want by changing your settings on the keyboard shortcut manager. Characters attack automatically, however, you can also left click to attack to make a combo if your stamina bar is full enough (when it's not, you can see a tiny white dot, its position depends on the weapon you have in hand and how much stamina it requires to activate a combo). You don't have to click on your target specifically to attack it unless you're using a long range weapon like a gun or a bow. You can parry by right clicking, this will consume stamina instead of health. Infecteds 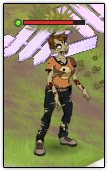 There are different types of infecteds and some have special abilities like exploding after they die or stunning you. You can see they have a health bar and some have a small colored dot on the left, this indicates their level and how strong they are. There are different types of infecteds and some have special abilities like exploding after they die or stunning you. You can see they have a health bar and some have a small colored dot on the left, this indicates their level and how strong they are.Level 0-4: None Level 5-9: Green Level 10-14: Blue Level 15-19: Purple Level 20+: Red Sometimes when you hit them they will become bigger, and skulls will show around them, be careful with these, as they are stronger than their original form. They sometimes give better loot than normal infecteds, although it's random. You can read about the different kinds of infecteds and their abilities here. Gathering resources and getting weapons 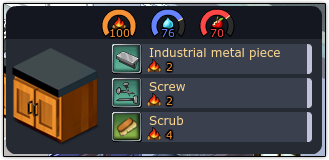 Gathering resources (this includes food) and fighting are the core aspects of the game, you will most likely be doing this when you're not exploring to complete missions or appreciate the landscape. Most things you see in game are clickable (chairs, trash cans, fridges, pillows, mushrooms, etc), you just have to hover over them and if they light up, get closer and click it, it'll show you what you can pick there. Gathering resources (this includes food) and fighting are the core aspects of the game, you will most likely be doing this when you're not exploring to complete missions or appreciate the landscape. Most things you see in game are clickable (chairs, trash cans, fridges, pillows, mushrooms, etc), you just have to hover over them and if they light up, get closer and click it, it'll show you what you can pick there.As you can see in the image, picking up items costs rest, so you have to manage your rest properly unless you want to go to the fire every 30 seconds. 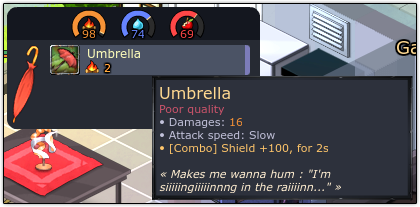 Like in real life, items vary in quality. Poor quality items tend to last less than a normal or good quality item. They also do less damage and sometimes have a slower attack speed. When gathering resources, do not pick up poor quality items, as they are not salvageable. Like in real life, items vary in quality. Poor quality items tend to last less than a normal or good quality item. They also do less damage and sometimes have a slower attack speed. When gathering resources, do not pick up poor quality items, as they are not salvageable.Hovering over the item will give you information about it. Its quality, the damage it does, attack speed, if it has any special effects, and sometimes a short phrase. You can see the quality of an item by hovering your mouse over it. You can also see the icon's border:  Poor quality. Not salvageable. Poor quality. Not salvageable. Normal quality. Normal quality. Good quality. Good quality. High quality. High quality. Exceptional quality. Exceptional quality. Legendary item. Not salvageable. Legendary item. Not salvageable.You can also see the kind of item it is and its durability from the background color:  Resources. Resources. Weapon, new / as good as new. Weapon, new / as good as new. Weapon, used. Weapon, used. Weapon, almost broken. Weapon, almost broken. Food. Food.Leveling up Every 5000xp you get a new level, you know you've earned it because your profile picture shines. New levels don't get automatically added, instead, you have to click your profile picture and choose a reward. This allows you to stack levels, so you can save them for later. (no use other than showing up really). When you open your profile you get to choose between three rewards, these can be blueprints, stats, skills, weapons, food, or resources. Always try to pick permanent stats, blueprints, and skills over other things, they will be more useful in the long run.
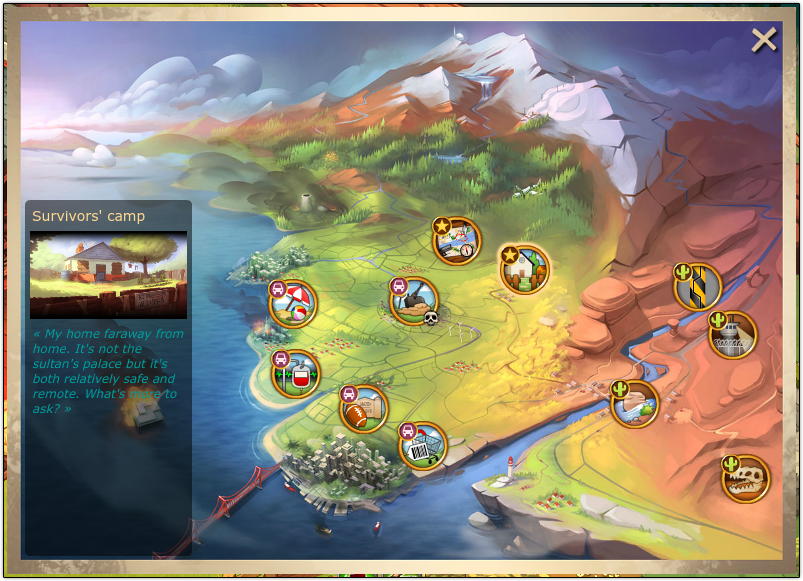
Moving around  To move to different zones you have to use your bike to access the map. These are usually at the "start" of the map (players' spawn point) close to the campfire. Some maps have more than one bike (camp has several, for example) to make things a bit easier. To move to different zones you have to use your bike to access the map. These are usually at the "start" of the map (players' spawn point) close to the campfire. Some maps have more than one bike (camp has several, for example) to make things a bit easier.When you click on your bike, a map will open, there you can choose where you want to go and see a small description of the area when you click on the icon.
Zones, side missions, and secret passages Zones When you start playing, you only start with one zone: Sacramento Suburbs. In order to unlock other places you must complete several of the main missions. For the time being, there are 11 zones, mostly based on real world locations:
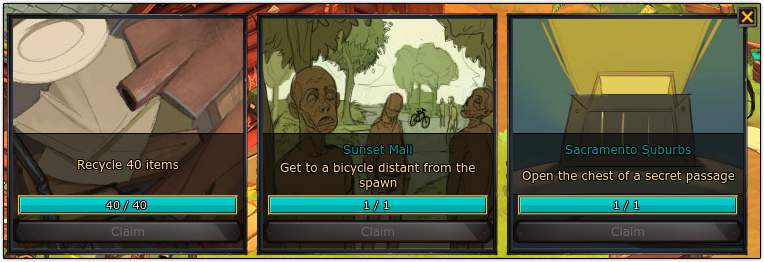
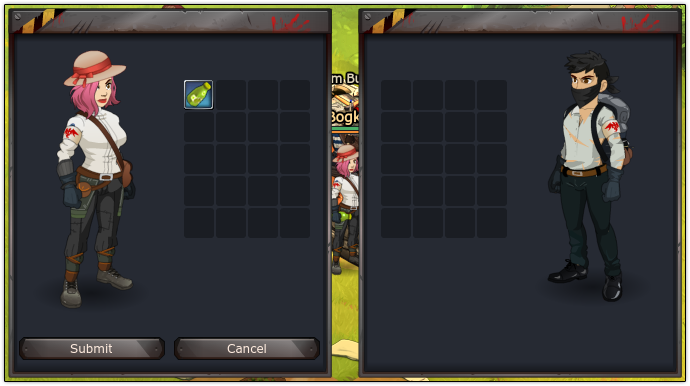
If you've unlocked any of the zones, you can visit them at any time you want to gather resources, independently of what mission you're in. They reset once a day, at 04:00 GMT +1, meaning that if you opened a trash can and then left the map, or grabbed a chair, you won't be able to reopen it or grab that same chair again until the next reset. Side missions Several of these zones have one or more side missions that can be done daily for experience points and reputation. These missions have nothing to do with the main story and are quite simple to complete, like feeding Glenn's hamster, Jon, on Mazon College. You can explore a bit to find the NPCs and complete their quests. They tend to rotate, so you won't find the same NPC needing help every day. Secret passages 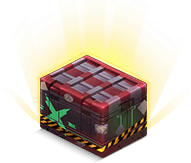 All zones also have several secret passages. These are dangerous zones with strong infected, but you can find better loot in these areas than in regular ones. They also have a box where you will usually find rare items (or canned soup, welp), but in order to open it you must kill 100 infected in the area. Each map has 3 or 4 secret passages, and one of them is always open. You'll know when you're in one because there is a timer at the top of your screen indicating when it closes, and a counter of how many infected have been killed to reach the goal and open the box. All zones also have several secret passages. These are dangerous zones with strong infected, but you can find better loot in these areas than in regular ones. They also have a box where you will usually find rare items (or canned soup, welp), but in order to open it you must kill 100 infected in the area. Each map has 3 or 4 secret passages, and one of them is always open. You'll know when you're in one because there is a timer at the top of your screen indicating when it closes, and a counter of how many infected have been killed to reach the goal and open the box.Bartering/trading Although not an essential part of the game, trading is fun and a nice way of players to help each other. To trade with someone, simply click their username in the chat or your friendlist and then click the 'trade' option. This window will shop up, to add items simply click them on your back:
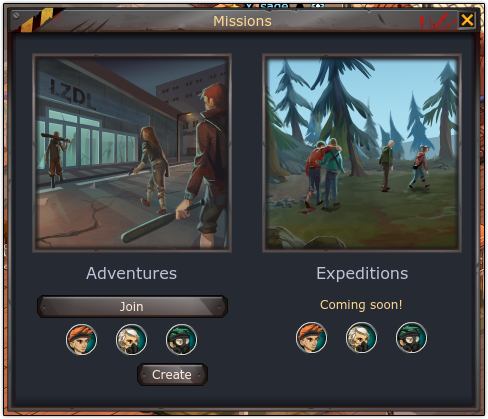
Adventures and expeditions Adventures allow you to play mini side stories where you have several missions to complete. Both adventures and expeditions take place in smaller maps that only appear there, and you can gather resources and get weapons. These can be done in Lakeview on either Sekou Iwume's workshop or the main building where Murphy and Collins are by clicking on the table, you'll get the option to join one or create one. Four people are required to be in the same group in order to start one.
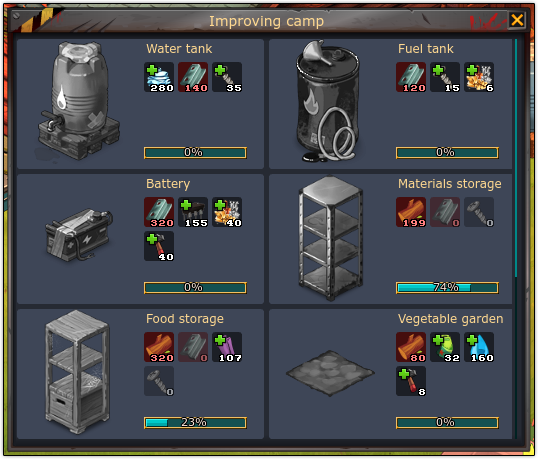
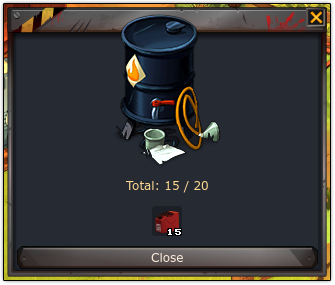
Bosses Bosses are bigger, more powerful versions of special zombies, like catapult, exploder, etc. They're hard to kill because of their high health and powerful attacks, so people kill them in groups. They usually drop very good loot (+1000 exp, survivor gear, etc), but you can only get loot from each type of zombie once a week. So if you killed a catapult earlier, you won't get loot from killing another catapult until next week. Survivor's camp Survivor's camp is your home, the most peaceful place in the game. You unlock it after a few missions and after cleaning it up a bit, you get to start building things in your new home to help you survive. It is a safe place, as no infecteds spawn here. There can be up to 8 players in each camp, and everyone can visit each other's home, but they cannot use their builds. Everyone starts with two basic builds: the building table, and the stock. All buildings can be moved by shift + clicking them, and they can be rotated pressing 'R'. Building table  This is what you use to make new buildings once you've unlocked/bought the blueprints. Making buildings cost materials that can be obtained by salvaging items or as level up rewards. This is what you use to make new buildings once you've unlocked/bought the blueprints. Making buildings cost materials that can be obtained by salvaging items or as level up rewards.On the image below you can see that each building requires a specific amount of resources to be built. If you have them on stock, you can transfer them to the building's stock by clicking on the icon, this will transfer 5 materials, so you have to click several times if you want to transfer more. This only works one way, so be careful, as you can't recover any resources once they've been transfered. Once all the materials needed have been transfered, and the progress bar reaches 100%, it'll let you place the building in your camp and start using it.
Stock 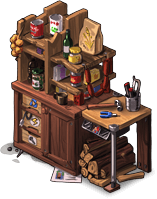 This is used to salvage items, meaning you get to change your loot for resources. This is used to salvage items, meaning you get to change your loot for resources. A few examples of materials:  Scrap metal Scrap metal Wood Wood Meat Meat Vegetables VegetablesThese resources can be used to make buildings, craft weapons, food, upgrade clothes, etc.
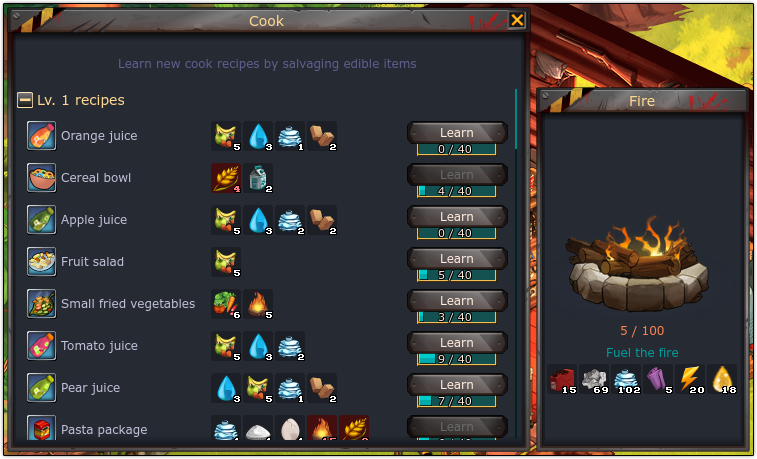
Kitchen stove 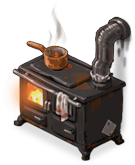 You can cook food and make drinks here with the resources you have if you've learned the recipe before by salvaging the item, buying it at Lakeview from Collins, or obtaining it as a reward from a mission. You can cook food and make drinks here with the resources you have if you've learned the recipe before by salvaging the item, buying it at Lakeview from Collins, or obtaining it as a reward from a mission.Foods have to be mastered in order to get normal or better quality, if you haven't mastered a recipe, there's a chance of getting poor quality food, or failing to make it. The amount of times you have to prepare the food to master it, and the amount and rarity of the materials needed depend on the level of the recipe. There are four levels: Level 1 recipes require you to prepare them 40 times. Level 2 recipes require you to prepare them 100 times. Level 3 recipes require you to prepare them 250 times. Level 4 recipes require you to prepare them 500 times. Some foods require fire, you can use materials like wood, paper, plastic, fuel, etc to feed the fire.
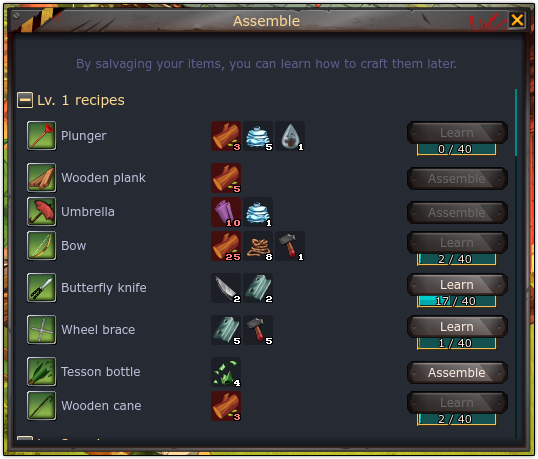
Assembling table  Used to craft weapons. Used to craft weapons. Like the kitchen stove and many other buildings, you need to learn the recipe of the weapon you want to make first in order to make it, and you have to master the recipe to stop getting poor quality items.
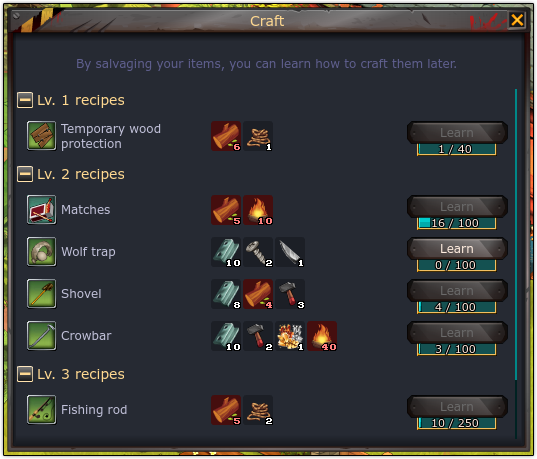
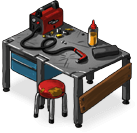
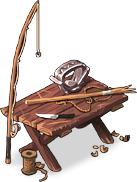
Crafting table  Used to craft useful items like matches, fishing rods, crowbars, etc. Used to craft useful items like matches, fishing rods, crowbars, etc.
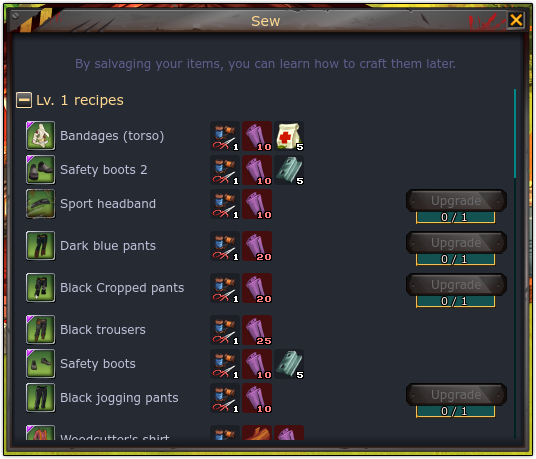
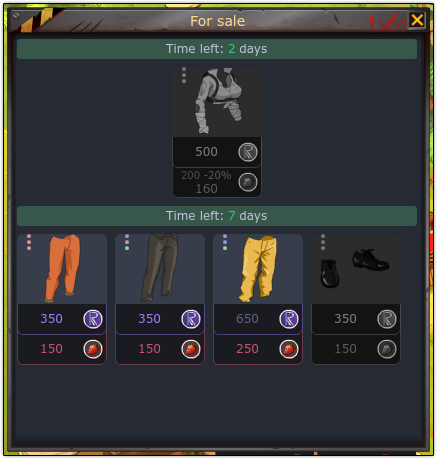
Sewing workshop 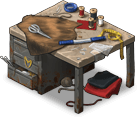 Used to upgrade clothes. Used to upgrade clothes.Clothes can be bought at poor quality from Sam Bullock. His shop updates once a day. If you don't like something one day, don't worry, just check the next one and there'll be new stuff. If you didn't have enough money to buy something you liked one day, it'll come back eventually. Many things vary depending on the level of clothing: Level 1: - Most cost 200 rep / 100 fraises. - Have a white name. - Need to be upgraded once to get a better quality. - Depending on their quality [poor, normal, good, high, exceptional] they have a max health bonus of: 0 / 2 / 4 / 6 / 8 points. Level 2: - Most cost 350 rep / 150 fraises. - Have a green name. - Need to be upgraded twice to get a better quality. - Depending on their quality they have a max health bonus of: 0 / 3 / 8 / 10 / 12 points. Level 3: - Most cost 500 rep / 200 fraises. - Have a blue name. - Need to be upgraded four times to get a better quality. - Depending on their quality they have a max health bonus of: 0 / ? / 8 / 12 / 16 points. Level 4: - Most cost 650 rep / 250 fraises. - Have a purple name. - Need to be upgraded eight times to get a better quality. - Depending on their quality they have a max health bonus of: 0 / ? / 10 / 16 / 20 points.  Each upgrade requires a sewing kit, these can be obtained when salvaging sewing equipment (level up reward, research projects) or upgrade kits. Each upgrade requires a sewing kit, these can be obtained when salvaging sewing equipment (level up reward, research projects) or upgrade kits.
Upgrade kits       Depending on the clothes quality, they can also be equipped upgrade kits. Poor quality: 0 kit slots. Normal quality: 1 kit slot. Good quality: 2 kit slots. High and exceptional quality: 3 kit slots. Clothes don't take any upgrade kit, there are 3 kinds:  battle, battle,  support, and support, and  protection, these vary depending on the clothes, so pay attention to the color of the dots to the left of the clothes on the shop before buying them. protection, these vary depending on the clothes, so pay attention to the color of the dots to the left of the clothes on the shop before buying them.Upgrade kit stats vary depending on their quality. The higher the quality of the kit the better the stats it has. To place a kit on your clothes simply open your profile, put on the piece of clothing you want to equip the kit on, and drag the kit from your bag to the desired slot. Once placed it cannot be removed, only replaced, so make sure you really want those pants to have that kit before doing anything. You can read more about upgrade kits here.
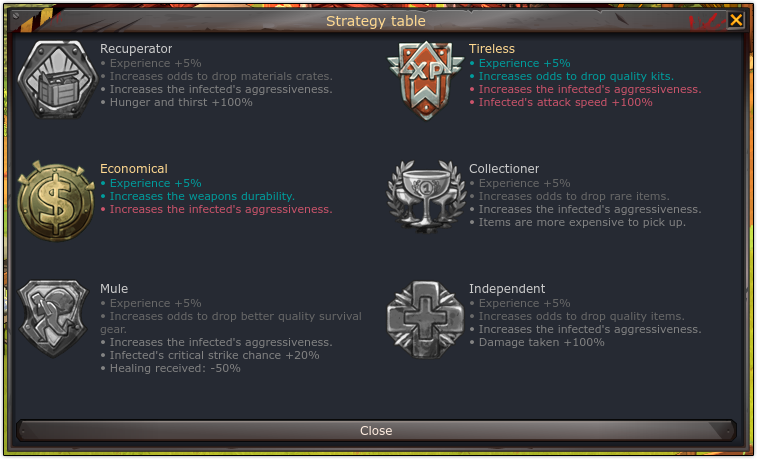
Strategy table  Can be used to choose strategies that make the game harder in exchange for bonuses like better loot and more experience. Can be used to choose strategies that make the game harder in exchange for bonuses like better loot and more experience.Blueprint can be unlocked as a level up reward or bought from Lynn Durand for 500 reputation.
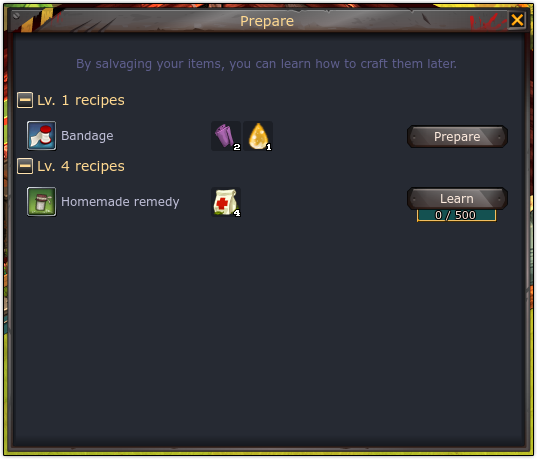
Laboratory 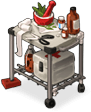 Used to craft medicines and medical stuff like bandages. Used to craft medicines and medical stuff like bandages.Blueprint can be bought from Lynn Durand for 100 reputation.
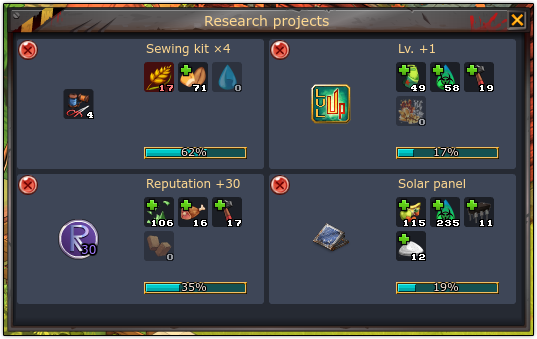
Research workshop  Used to do research projects that can grant you levels, reputation, sewing kits, skills, blueprints, etc. You can have up to 4 active projects at the same time and can also cancel one every 24 hours to get a new project. Used to do research projects that can grant you levels, reputation, sewing kits, skills, blueprints, etc. You can have up to 4 active projects at the same time and can also cancel one every 24 hours to get a new project. You can unlock it as a level up reward or buy it from Lynn Durand for 400 reputation.
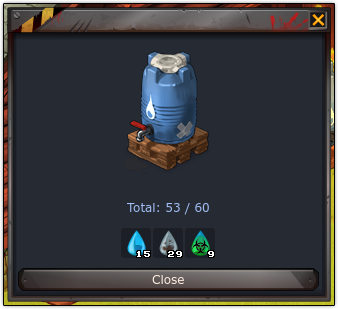
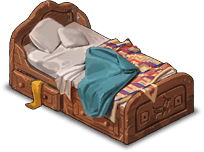
Bed  Works like the campfire, fills your rest bar, gives you the experience you've earned, and gives you bonus health points for a short amount of time. Works like the campfire, fills your rest bar, gives you the experience you've earned, and gives you bonus health points for a short amount of time. Blueprint can be bought from Lynn Durand for 10 survivor marks. Chicken coop  Used as a secondary resource for eggs. Comes with a cute chicken. Used as a secondary resource for eggs. Comes with a cute chicken.Blueprint can be bought from Lynn Durand for 500 reputation. Goat pen  Used as a secondary resource for milk. Comes with a pretty goat. Used as a secondary resource for milk. Comes with a pretty goat.Blueprint can only be gotten from the research workshop. Vegetable garden  Allows you to plant seeds and grow plants to get materials like wood, chocolate, fabric, cereals, etc. It requires you to water it constantly. You can build up to 6 vegetable gardens. Allows you to plant seeds and grow plants to get materials like wood, chocolate, fabric, cereals, etc. It requires you to water it constantly. You can build up to 6 vegetable gardens.Blueprint can be unlocked as a level up reward or bought from Lynn Durand for 300 reputation. For more information about plants, you can read this article. Solar panel  Used as a secondary resource for electricity. It slowly collects electricity. Used as a secondary resource for electricity. It slowly collects electricity. Blueprint can only be gotten from the research workshop. Engine-generator set  Allows you to convert fuel to energy. Allows you to convert fuel to energy. Blueprint can only be gotten from the research workshop. Other storage Water tanks  Allows you to store drinking water, dirty water and toxic water. Players can have up to four water tanks and they can store a total of 20 water each (any water, not each kind). Allows you to store drinking water, dirty water and toxic water. Players can have up to four water tanks and they can store a total of 20 water each (any water, not each kind).
Fuel tanks  Allows you to store fuel. Players can have up to four fuel tanks and they can store 20 fuel each. Allows you to store fuel. Players can have up to four fuel tanks and they can store 20 fuel each.Blueprint can be unlocked as a level up reward or bought from Lynn Durand for 100 reputation.
Materials storage 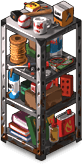 Adds extra storage for resources on your stock. Players can have up to four materials storages and each adds an extra line of spaces to your stock. Adds extra storage for resources on your stock. Players can have up to four materials storages and each adds an extra line of spaces to your stock.Blueprint can be unlocked as a level up reward or bought from Lynn Durand for 150 reputation. Food storage 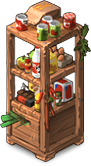 Adds extra storage for food on your stock. Players can have up to four food storages and each adds an extra line of spaces to your stock. Adds extra storage for food on your stock. Players can have up to four food storages and each adds an extra line of spaces to your stock.Blueprint can be unlocked as a level up reward or bought from Lynn Durand for 150 reputation. Battery  It's used to store electricity. Players can have up to four batteries and they can store 50 electricity each. It's used to store electricity. Players can have up to four batteries and they can store 50 electricity each. Blueprint can only be gotten from the research workshop. Storage  Allows you to save up to 6 items. Players can have up to four storages, for a total of 24 items. You can use it to save valuables like your most precious weapons, upgrade kits, etc. Allows you to save up to 6 items. Players can have up to four storages, for a total of 24 items. You can use it to save valuables like your most precious weapons, upgrade kits, etc.You can buy the blueprint from Lynn Durand for 100 reputation. Dressing table 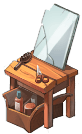 Allows you to change your hairstyle. Allows you to change your hairstyle.Blueprint can be unlocked as a level up reward or bought from Lynn Durand for 300 reputation. Thanks to Fewfre for making an amazing wiki and the community for keeping it updated! If you need specific information regarding zones, how to get resources, and many other things, make sure to visit it. Thanks to Bishomilad for helping with the camp tab! Feel free to translate this to any language, but please inform me so I can know who's doing X community's guide and list it here. Dernière modification le 1519000860000 |


 Bog
Bog Profil
 Derniers messages
 Tribu
Tribu


 Bishomilad Bishomilad  « Citoyen » 1516349640000
| 1 | ||
| Perfect Guide Kitty |
 Bishomilad
| Bishomilad « Citoyen » 1516350180000
| 1 | ||
| The Camp  it's the most peaceful place in the game you can access it by the Bike
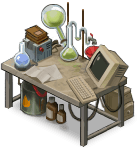
1)Buildings and you can move all the buildings by Shift+click the Buildings When it is your first time you could have one building which is the 1.Stock  -used toSalvage which means that you change Loot to be Resources  Resources: 1.Scrap metal  2.Wood  3.Fuel  4.Tools  5.Rope  6.Meat  7.Fish  8.Vegetable  9.Fruits  10.Fire  11.Paper  12.Plastic  13.Fabric  14.Screw  15.Fertilizer  16.Precious ore  17.Glass  18.Electricity  19.Electronic component  20.Chocolate  21.Drinking water  22.Dirty water  23.Toxic water  24.Cereals  25.Butter  26.Salt  27.Milk  28.Spices  29.Cheese  30.Sugar  31.Eggs  32.Blade  33.Seeds  34.Alcohol  35.Medical Herb  36.Powdered Medicine Use Resources to build Buildings and craft weapons,Food and clothes 2.Kitchen Stove -Used to cook food from Resources
3.Assembling Table -Used to Craft weapons from Resources
4.Crafting Table -Used to Craft Tools with Resources
5.Sewing Workshop  -Used to sew clothes from Resources 5.Strategy Table -Used to Choose the Strategy you want from six,you can also take from 1:6 strategies each one gives you buff and debuff
6.Laboratory -Used to Craft medicines and Medical stuff (bandages etc...) from Resources
7.Research Workshop -Used to gain Reputation and XP (or skills,survivor marks ) by collecting certain required Resources
8.Bed -Used to restore Rest
9.Chicken Pen -Used as a secondary Resource for eggs
Dernière modification le 1528284480000 |
 Or by the


| Bishomilad « Citoyen » 1516397580000
| 8 | ||
| 10.Goat Pen -Used as a secondary Resource for Milk
11.Vegetable Garden -Used as a secondary Resource for (wood,fabric,vegetables and fruit) but they need Water and fertilizer
12.Solar Panel -Used as a secondary Resource for Electricity
13.Engine Generator set
2)Storage Buildings 1.Water Tank -Used to store an amount of {Water,Dirty Water,Toxic Water}
2.Fuel Tank -Used to store an amount of {fuel}
3.Materials Storage -Used to store an additional amount of most of the Resources
4.Storage -Used to store Materials like weapons and loot
5.Food Storage -Used to store an additional amount all of the food Resources
6.Battery -Used to store {Electricity}
|


Anythin  « Consul » 1516651800000
| 0 | ||
| With this new recycling system introduced, how do you get rid of items that are of poor quality, and thus cannot be salvaged? I don't really wish to have to use them. Edit: nevermind, to get rid of them simply use the items to make a fire. Dernière modification le 1516654680000 |
| 0 | ||
Anythin a dit : You can also drag them to the map to throw them away. |
| Anythin « Consul » 1516721100000
| 0 | ||
| Oh thanks, this explains why I sometimes see random loot drops in my survivor house. |
| 1 | ||
| Well done, this thread should be pinned. |

| Boucharma « Censeur » 1517474640000
| 0 | ||
| Thanks! |
Akillitilki  « Censeur » 1517603580000
| 0 | ||
| can someone tell me what is bodega farm? and how to do it?? |
| 0 | ||
Akillitilki a dit : Bodega farm is a secret passage in Bodega Bay, near the convenience store. Secret passages are open for one hour each and people have to kill 100 zombies inside to be able to open the box, which tends to have good items. Once it closes another one opens for an hour. Each map has 3-4 secret passages. |
| Madongseok « Citoyen » 1518884400000
| 0 | ||
| is it worth buying poor quality clothes |
Slayseer  « Citoyen » 1518902700000
| 0 | ||
Madongseok a dit : I'm pretty sure all clothes you buy start out as poor quality, then need to be upgraded. |
| Madongseok « Citoyen » 1518910140000
| 1 | ||
Slayseer a dit : then why would someone buy clothes with 500 rep than 200 rep ? |
Sar33aj  « Citoyen » 1519456020000
| 0 | ||
Akillitilki a dit : its in bodega bay |
Haterxpro  « Citoyen » 1521247140000
| 0 | ||
| Nice, but there's one bug and it's u can't change quality of game, whenever u change it to low or medium, it will change back to high. :') |
City_lights  « Censeur » 1521264660000
| 0 | ||
| Thanks a ton for this! I'm pretty new to DM (started playing pretty much on it's release day and a teeny bit before that in alpha and beta here and there) and it can get a bit confusing at times, This is really helpful. |
| 1 | ||
| They changed the Sewing Table and removed the Sewing Kits!! |

Kazray  « Censeur » 1521390240000
| 0 | ||
| Hey, mind if I add something here? |